
The news content type is used to publish time-sensitive content such as stories about events, initiatives or people/groups.
On this page:
Usage
Creating News
- Go to Manage > Content
- Click Add Content
- Select News
- Provide a Title
- Specify a Date & Time
- Optional: Provide an Author's Name
- Optional: Provide an Author's Email
- Provide an Image. This is optional but recommended! This is the image that appears at the top of news pages as well as listing views. Optional: you can now insert a remote video in place of an image.
- Click Choose File
- Upload and/or Select the image you wish to user and confirm
- Tip: It is recommend that images be at least 1296px wide and 16:9 aspect ratio. See image specs below for more detail.
- Provide an alternate text
- Optional: Provide an Image Caption
- Optional: Provide a Photo Credit
- Optional: Provide a subheader/teaser text
- Add your content in the Body
- Tip: See Rich Text Editor
- Optional: Assign a Category
- If you want to assign a category, ensure you have set up you News Categories first!
- See News Categories for details
- Save
The news content is now published and will appear in appropriate listing displays.
Editing News
- Go to Manage > Content
- In the Content Overview page, find the page you wish to edit
- Tip: Use the filter to refine your search. You can set the Content Type to News as well as include keywords from the title of the news content
- Alternative: You can also find the page where it is normally located when you visit it. If you are logged in and have permission to edit the page, you will be able to see the the local task tabs and click Edit.
- Once you find the news item you wish to edit, click Edit
- You will be taken to the page edit screen where you can make your desired changes
- Save
Promoting News
News stories can be promoted to the top of the News Listing and the News Headlines blocks. To promote a news item, do the following:
- Go to Manage > Content
- In the Content Overview page, find the news item you wish to edit
- Once you find the news item you wish to edit, click Edit
- Open the Promotion options tab on the righthand side of the screen and check the "sticky at top of lists" checkbox
- If promoting multiple news stories, use the Order dropdown to order them
- Save
Please note: Be sure to reset both the order and the promotion checkbox when the story should no longer be promoted.
Removing News
News can be "removed" one of two ways:
- Unpublishing: Hides the content from public view
- Deleting: Permanent removal for your site
Unpublishing News
- Go to Manage > Content
- In the Content Overview page, find the news content you wish to unpublish
- Tip: Use the filter to refine your search. You can set the Content Type to News as well as include keywords from the title of the page
- Alternative: You view the page as normal. If you are logged in and have permission to edit the page, you will be able to see the the local task tabs and click Edit.
- Once you find the news item you wish to edit, click Edit
- Uncheck the Published checkbox
- Warning: Unpublished pages are only visible to the content's author when they are logged in.
- Save
Deleting News
Please note that deleting content is permanent and irreversible.
- Go to Manage > Content
- In the Content Overview page, find the page you wish to delete
- Tip: Use the filter to refine your search. You can set the Content Type to News as well as include keywords from the title of the page
- In the Operations column of the news content you want to delete click the arrow down button next to edit and click Delete
- Alternative: You can click Edit to go to the page edit screen and click the Delete button at the bottom.
- Alternative: You can view the page as normal. If you are logged in and have permission to delete the page, you will be able to see the the local task tabs and click Delete.
- You will be taken to a confirmation page. Click Delete to confirm.
- Warning: As with all deletions in Drupal, deleting pages is permanent and cannot be undone.
Remote Video
News content can now use a lead video instead of a lead image. When selecting an image, select the Remote video tab on the left and provide the URL of the video (Youtube, Vimeo), then click Add, select the video and Insert selected. The remote video will take place of the lead image in the news.
News Categories
News content can now be categorized. The category field for News content type uses the News Categories vocabulary. If you would like to categorize your news items, you would first need to fill the vocabulary with terms to tag your content with.
Creating a Category
- Go to Manage > Structure > Taxonomy
- Find the News Categories and click List terms
- Click Add Term
- Provide a Name
- Warning: Avoid special characters! This may cause issues in some listing paths.
- Tip: Refer to the taxonomy best practices for tips regarding valid terms
- Save
The terms you add to News Categories will be available as an option to choose in the category field when you create or edit news content.
Editing a Category
- Go to Manage > Structure > Taxonomy
- Find the News Categories and click List terms
- For the term you wish to edit, click Edit
- Provide a new Name
- Save
Warning: Editing a name will updated to the new name where it is used. However, links (such as in the menu, or in body) that is using the path with the old name will need to be updated manually.
Removing a Category
- Go to Manage > Structure > Taxonomy
- Find the News Categories and click List terms
- In the Operations column of the term you wish to remove, click the arrow down next to the edit button and click Delete.
- You will be taken to a confirmation page. Click Delete to confirm.
- Warning: As with all deletions in Drupal, deleting a term is permanent and cannot be undone.
Deleting a category would remove any listing views of it. It will also unassign the category to news content it was associated with, although it might not reflect on the page itself right away. If that is the case, submit a ticket to have us clear the cache manually.
- See Taxonomy
Listing Page
When you publish news articles, they are automatically added to a news listing page.
By default the news listing page of any subsite can be found under /news.
For example: The news listing in the I&ITS site is located at www.utm.utoronto.ca/iits/news.
Categorized Listings
The default listing will list any News content that exists. If you categorized your news content by creating and assigning categories as mentioned above, you can access a filtered list that will only contain content assigned a specific category
By default it follows the pattern of /news/name-of-term.
For example: If I&ITS website had a news category called "Announcements", only news content tagged as announcements can be found under /news/announcements.
If you wish to link to a specific listing, you can find the paths available in Site Details page.
- See Site Details > URL Paths for Categorized Listings
- See Taxonomy
- See URL Aliases > Important Information
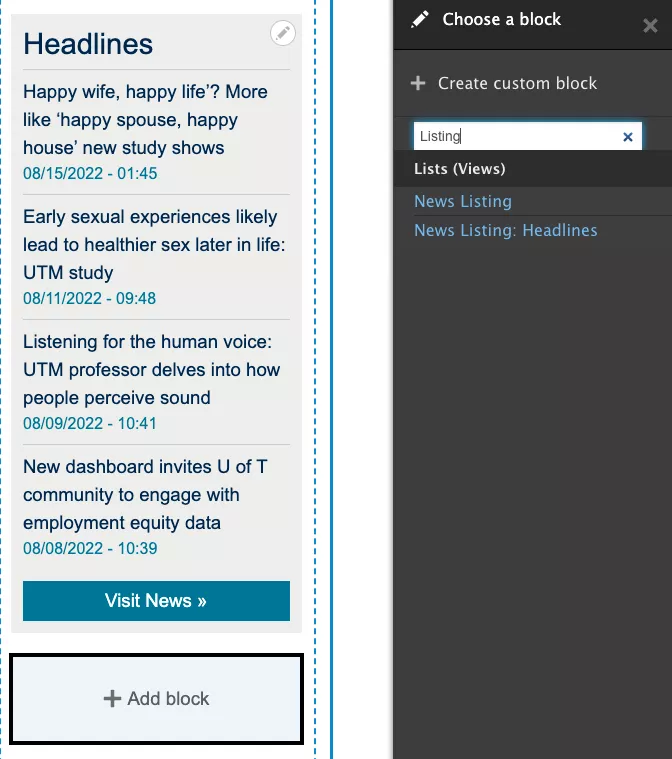
Listing Blocks
There are two blocks available for news listings:
- News Listing (Grid Display)
- News Listing: Headlines
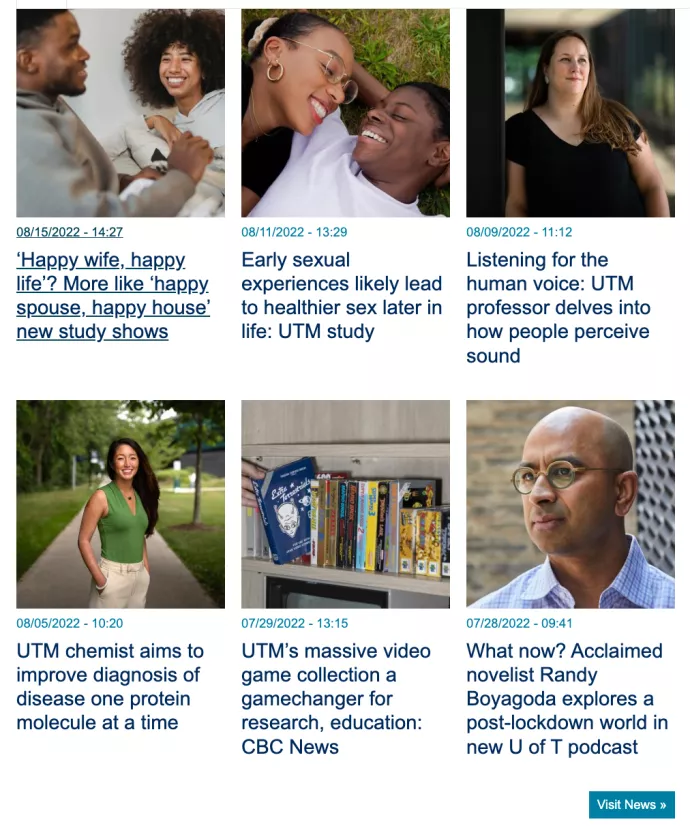
News Listing (Grid Display)
The news listing grid display block displays the thumbnail image, headline and date/time published information for a number of news items, along with links to the news item.
It appears in a three column grid.
Configuration Options
- Display Title
- Can toggle the display of the title on/off
- Items per block
- Set the number of items to show
- The default and minimum number of items is 3
- Tip: Works best in multiples of 3. The recommendation is a max of 6.
- Optional: Override Title
- Provide a custom title for the block display.
- This will not appear if the Display Title is toggled off.
News Listing: Headlines
The headlines block displays the headlines with links to the news item, along with date/time published information for a selected number of news items.
It is a minimal listing of news items and is best displayed on the right sidebar of the layout.
Configuration Options
- Display Title
- Can toggle the display of the title on/off
- Items per block
- Set the number of items to show
- The default and minimum number of items is 4
- Tip: The recommendation is a max of 6.
- Optional: Override Title
- Provide a custom title for the block display.
- This will not appear if the Display Title is toggled off.

Placing News Listing Blocks
Placing the News Listing Blocks in basic pages is the same process as placing any block.
We recommend placing news listing blocks on your Home Page.
- Visit your Home Page
- If you are logged in and able to edit, you should see the local task tabs and be able to click Layout
- In the area you want to the block to appear, click Add Block
- The News Listing blocks should appear on the list of available blocks to be placed. Select the one you wish to use.
- Tip: Do not use both at once!
- Be mindful of the space you wish to use. The grid block works best in the main area where as headlines works best on the right sidebar.
- Optional: Configure the block
- With your block placed, click the contextual edit button (Pencil Icon) for the block and select configure.
- You can apply the configurable options mentioned above.
- Click Update
- Click Save Layout
- See Blocks
- See Layout
Specifications
Fields
- Title
- Plain Text
- This field dictates the news title
- Date
- Date & Time
- This field dictates the publishing date and time displayed in the article
- Author
- Plain Text
- This field dictates the author name displayed
- Author's Email
- This field dictates the email linked and displayed
- Image
- Media
- This field dictates the lead image that appears on the page and listing views.
- The standard for lead images in 1296px wide by 729px tall. This is a 16:9 aspect ratio. You must crop images yourself to achieve this aspect ratio!
- The lead image scales based on width while maintaining aspect ratio
- If the image itself is shorter than 1296px wide, a placeholder background will occupy the remaining space
- If there is no image provided, no image will be displayed on a page and a place holder icon will appear for listing views
- All images should have an alt-text
- Your department, UTM, or U of T should hold full rights to the image being used
- Image Caption
- Plain Text
- This field dictates the descriptive text displayed
- Photo Credit
- Plain Text
- This field dictates the photo credit text displayed
- Subheader/Teaser Text
- Plain Text
- This field dictates the text that appears before the entire content or in teasers
- If this field is empty, the teaser defaults to a trimmed excerpt of the body field
- Body
- Rich Text Editor
- This dictates the content that appear in page.
- Category
- Term Reference
- This dictates the category assigned to a news content
- This field requires the terms in the News Categories vocabulary
- It will appear empty if you do not have categories available to be selected. Ensure you have categories set up first.
Options
- Publishing
- Published
- Sets the status of the pages to Publish / Unpublish
- Preview
- Allows you to preview the page before saving
- Delete
- Deletes the page. This is permanent and irreversible.
- Published
- URL Alias
- Generate automatic URL alias
- Keeping this checked sets URL aliases to automatic. It's recommended to set aliases to be automatically generated.
- URL Alias
- This field is fillable only if aliases are not set to automatic
- See URL Aliases for more information
- Generate automatic URL alias
Best Practices
- Avoid special characters in category names
- Avoid displaying too many items in block listings. The recommendation for grids and headlines is a max of 6.
- News writing uses the “inverted pyramid” form of storytelling, which clusters the most important information at the beginning of the story (the “who/what/where/when/why”), followed by details of diminishing importance. Further information can be found at:
- Keep news stories short, particularly on the web. Limit the word count to no more than 400-500 words. Titles and captions should also be short
- Use active verbs, and avoid long or convoluted sentences. Clarity is best
- Include links wherever relevant
- Put the names of U of T Mississauga faculty, staff or students mentioned in the copy in bold text.
- If you are republishing the story from another source, ensure that you have permission to do so, and include the name of the author and a link to the original source
- News content should be noteworthy, should relate to something recent (not “old” news) and ideally it should quote individuals who are relevant to the story. It should also include a relevant image with sufficient alt-text for which your department, UTM, or U of T holds full rights