
Majority of your site will consist of basic pages that contain a title and a body. The body can be any combination of formatted text, links, and embedded media such as images.
On this page:
Usage
Creating a Basic Page
- Go to Manage > Content and click the Add Content button
- Alternative: From the toolbar, you can go to: Shortcuts > Add Content
- Select Basic Page
- Provide a title for your page in the Title Field
- Provide content for your page in the Body Field
- The body field uses the Rich Text Editor
- Save
Adding a page to menu (OPTIONAL)
A page is separate from its menu link. A page can exist without being added to the menu. It is not automatically added to it and requires an extra step.
You can add a page to your menu one of two ways:
- In Page: When creating or editing a basic page
- In Configuration: Through the Menus option from the "Structure" section of the site
In Page
- In the page creation / edit screen, you will find Menu Settings on the right hand side
- Checking Provide Menu Link will add a menu link to the page in the navigation
- Tip: Unchecking this checkbox will do the reverse and remove the menu link to the page from the navigation
- There are some non-mandatory options available to be set here. For detailed information, refer to the options specifications below.
In Configuration
- Go To Manage > Structure > Menus
- For Main Navigation, click Edit Menu
- Click Add Link
- Provide a Title and a Link
- Tip: The title of your menu item should match your page's title
- Tip: Use relative links when referring to a page within your site. You can simply type the title of the page you would like to link to and it should appear in the list for you to choose
- Save

- See Menus for more information on how to manage your menu.
Setting a Custom URL alias (OPTIONAL)
You can create an alias one of two ways:
- In Page: When creating or editing a basic page
- In Configuration: Through the URL Aliases option from the "Configuration" section of the site
In Page
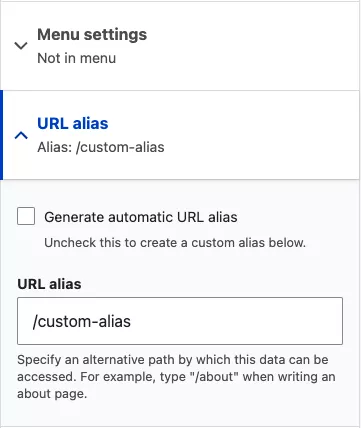
- In the page creation / edit screen, you will find URL alias on the right hand side
- Uncheck Generate automatic URL alias
- Warning: URL Aliases should always be set to generate automatically. Custom aliases should only be used under special circumstances.
- Provide a URL alias.
- It should be a relative path. Only enter the portion after your subsite name (a relative path) with no leading or trailing slash or your page may become inaccessible. See URL Alias > Best Practices for detailed information on valid aliases.
- The path specified here will be what is used by all navigating functions in the site. See URL Alias > Important Note for detailed information on how aliases affects your site.
In Configuration
- Go to Manage > Configuration
- Under Search and metadata, Click URL aliases
- Click Add Alias button
- Provide the system path
- Provide the URL alias
- Save
Use With Caution. Improper use or misconfiguration of URL aliases could lead to navigation/path issues, inaccessible pages, and manual maintenance of URLs.
- See URL Alias for more information on how to manage your URL Aliases.
Adding a social media image
You may optionally choose to add a custom image that appears when sharing your basic page on social media.
- At the bottom of your basic page, open the Social (OPTIONAL) tab
- Click the Add Media button, and either select from an existing image or upload a new one.
- See Media Usage for additional image uploading instructions.
- NOTE: Ensure you provide proper alt text for your selected image
- Tip: Output image sizes vary depending on the social platform, but best practice is to use an image that's close to 4:3 aspect ratio, and at least 600px wide. Expect some cropping of your image based on platform.
- Save
Editing a Basic Page
- Go to Manage > Content
- In the Content Overview page, find the page you wish to edit
- Tip: Use the filter to refine your search. You can set the Content Type to Basic Page as well as include keywords from the title of the page
- Alternative: You can also find the page where it is normally located when you visit it. If you are logged in and have permission to edit the page, you will be able to see the the local task tabs and click Edit.
- Once you find the content you wish to edit, click Edit
- You will be taken to the page edit screen where you can make your desired changes
- Save
Removing a Basic Page
Pages can be "removed" one of two ways:
- Unpublishing: Hides the content from public view
- Deleting: Permanent removal for your site
Unpublishing a Page
- Go to Manage > Content
- In the Content Overview page, find the page you wish to unpublish
- Tip: Use the filter to refine your search. You can set the Content Type to Basic Page as well as include keywords from the title of the page
- Alternative: You view the page as normal. If you are logged in and have permission to edit the page, you will be able to see the the local task tabs and click Edit.
- Once you find the content you wish to edit, click Edit
- Uncheck the Published checkbox
- Save
Unpublishing a page does not automatically remove it from the menu. Menu links to an unpublished page will not appear for public users and will only appear to the content's author if they are logged in.
If you wish to remove it from the menu as well, you can uncheck the Provide a Menu Link checkbox in the page's Menu Settings.
You can also remove it through your menu's configuration. See Menus for details.
Deleting a Page
Please note that deleting content is permanent and irreversible.
- Go to Manage > Content
- In the Content Overview page, find the page you wish to delete
- Tip: Use the filter to refine your search. You can set the Content Type to Basic Page as well as include keywords from the title of the page
- In the Operations column of the page you want to delete click the arrow down button next to edit and click Delete
- Alternative: You can click Edit to go to the page edit screen and click the Delete button at the bottom.
- Alternative: You can view the page as normal. If you are logged in and have permission to delete the page, you will be able to see the the local task tabs and click Delete.
- You will be taken to a confirmation page. Click Delete to confirm.
- Warning: As with all deletions in Drupal, deleting pages is permanent and cannot be undone.
Reverting Revisions
- Go to Manage > Content
- In the Content Overview page, find the page you wish to edit
- Tip: Use the filter to refine your search. You can set the Content Type to Basic Page as well as include keywords from the title of the page
- Alternative: You can visit the page as normal. If you are logged in and have permission to edit the page, you will be able to see the the local task tabs and click Revisions.
- Once you find the content you wish to edit, click Edit
- You will be taken to the page edit screen where you can see the Revisions tab at the top.
- Find the revision you wish to revert to and click Revert
- You will be taken to a confirmation page. Click Revert to confirm.
Layout
You can include additional content to your pages in the form of blocks. Layout is what allows you to place blocks of content along with the body of your page.
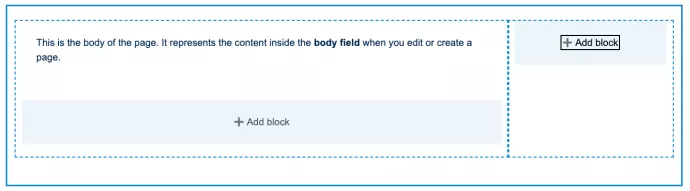
Basic Pages have a default layout available for use. A Main Content and a Right Sidebar.
By default the body of the page (content inside the body field when you edit or create a page) will occupy the main content area. If the Right Sidebar is empty, it will span a full width of the entire page. If the Right Sidebar is not empty, the page will be a 3/4 + 1/4 column combination.
You can add blocks in each area. The space available will have an effect on how certain blocks display.
- See Blocks
- See Custom Block Library
Specifications
Fields
- Title
- Plain Text
- This field dictates the page's title
- Body
- Uses the Rich Text Editor. See Rich Text Editor for details.
- This field dictates the page's in-page content
Options
- Publishing
- Published
- Sets the status of the pages to Publish / Unpublish
- Preview
- Allows you to preview the page before saving
- Delete
- Deletes the page. This is permanent and irreversible.
- Published
- Menu Settings
- Menu Link Title
- By default, the menu will use the page's title as the menu link title. Whatever is provided in this field will override it.
- For consistency, it is recommended to leave this blank and allow the menu to simply use the page's title.
- Description
- The description is shown as a title when hovering the menu link.
- Parent Link
- By default, new menu links will sit at the top level.
- This field indicates where the menu link will be organized under.
- For example: If you want your 'Contact' page to be nested under 'About Us', indicate 'About Us' in this field.
- Weight
- This indicates the sort order.
- See Menus for more information on managing menu items.
- Menu Link Title
- URL Alias
- Generate automatic URL alias
- Keeping this checked sets URL aliases to automatic. It's recommended to set aliases to be automatically generated.
- URL Alias
- This field is fillable only if aliases are not set to automatic
- The path specified here will be what is used by all navigating functions in the site (Menu, breadcrumbs, etc.)
- Overriding the default automatic behaviour would mean:
- The path will not automatically update or redirect the paths when pages change locations or are renamed. You will need to update the alias accordingly.
- Misconfiguration could lead to broken links and inaccessible pages
- See URL Aliases for more information
- Generate automatic URL alias
Best Practices
- Save often!
- Leave automatic URL alias checked wherever possible
- If adding to the menu, the title of your menu item should ideally match the page's title
- Delete pages you no longer need instead of leaving them unpublished for an indefinite amount of time. This frees up the use of titles and paths.
- Use the appropriate syntactical styles; See Accessible Text, Headings and Documentation and Pre-defined Styles in the Rich Text Editor.