
One-on-one appointments at the RGASC are booked through a scheduling program called WCONLINE. Online synchronous and e-tutoring (asynchronous) are conducted through the system also. In person appointments are held at the RGASC (MN 3251) but must be booked using the WCONLINE system.
For questions or help with WCONLINE, contact the RGASC at academicskills.utm@utoronto.ca.
Some of the common actions you will take in WCONLINE include:
- Booking an Appointment in WCONLINE
- Uploading a Document for an Online Appointment
- Joining an Online Synchronous Appointment
- Participating in an E-Tutoring Appointment
- Cancelling an appointment
- Changing your profile and communication settings
Appointment Rules
You can book up to two appointments per schedule per week. You can cancel appointments up to two hours before the appointment time. if you do not attend an appointment, you will be marked as a no show. Your WCONLINE account is automatically suspended after two no shows. You must contact the RGASC at academicskills.utm@utoronto.ca to restore your account.
WCONLINE includes a waiting list for each day. If an appointment slot if already booked, you can join the waiting list for that day, and receive an email or text notification if the timeslot becomes available.
If you book an appointment under the wrong schedule, (for example a Math & Numeracy appointment under the Writing schedule) your appointment will be cancelled and you will receive an email instructing you to rebook your appointment.
Booking RGASC Appointments in WCONLINE
- Navigate to the https://uoft.me/writingcentres website.You are redirected to the WCONLINE Writing Centres Quercus page.
- Click the link to access the Robert Gillespie Academic Skills Centre WCONLINE schedules.
- When prompted, login to WCONLINE. Create an account if you have not already done so. The WCONLINE booking page opens.
- At the top of the page, click Schedules. Choose the appropriate schedule from the list that appears. The schedule for the current week appears.
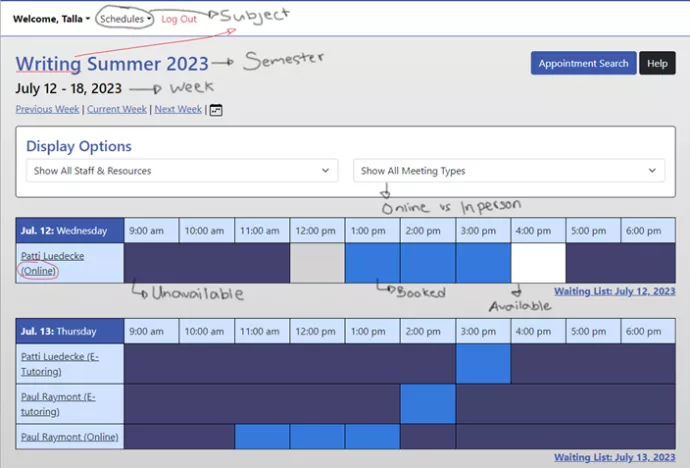
The Instructors offering appointments for a given day are listed in the schedule.
The delivery format for the instructor's appointments that day is indicated next to the instructor's name.
Coloured blocks indicate the availability of a timeslot:
- Dark Purple -- This time slot is unavailable. It was not scheduled for an appointment
- Blue -- This time slot has been booked by another student.
- White -- This time slot is available and can be booked now.
You can also hover over each timeslot to see booking details for each timeslot.
To view different weeks in the schedule, click Previous Week, Current Week, and Next Week.
To filter for a particular instructor, choose from the Show All Staff & Resources menu.
To filter for a particular delivery format, choose from the Show All Meeting Types menu.
To join the waiting list for a particular day, click the Waiting List link before that day's schedule.
To book an appointment
- Click on the white box for the time slot you want to book. The Create New Appointment form window appears.
- Answer the questions on the form to help the instructor understand what you are hoping to discuss during your appointment. You can also upload documents, like assignment instructions, or your draft, for your instructor to look at during your appointment.
- Click Create Appointment. A message confirming that your appointment was booked successfully will appear. Options to attach a file, print, edit, or cancel the appointment appear at the bottom of the confirmation page. You will also receive a confirmation email to your University of Toronto email address.
Uploading a Document for an Online (Synchronous or e-Tutoring) Appointment
- Log in to WCONLINE and open the schedule in which your appointment is booked.
- Click on the appointment to which you want to attach a file. A new window appears with your appointment details.
- At the bottom of the appointment window, click Attach File. A new window appears.
- Click Choose File and navigate to the file you want to upload. Click Open.
- Click Attach File. Your file is added to the appointment and will be accessible to your instructor.
Joining an Online Synchronous Appointment
Online synchronous appointments are conducted through WCONLINE using Zoom. You can see and speak to the your instructor and collaborate on a file you upload before your appointment begins.
To join an online synchronous appointment:
- Five or ten minutes before the appointment time, log in to WCONLINE and navigate to the schedule in which your appointment is booked.
- Click on the appointment you want to join. This will open a new window with your appointment details.
- Click Start or Join Online Consultation. This will launch Zoom in the browser or desktop application.
- The instructor will admit you to the meeting.
To collaborate on your uploaded document with the instructor:
- In Zoom, click View Options, and choose Request Remote Control. A window appears asking "Request remote control of the instructor's screen?"
- Click Request. The Instructor will give you control. You and the instructor can now make synchronous changes to your document(s). Click on the shared screen to make changes.
Participating in an E-Tutoring Appointment
E-tutoring appointments are asynchronous. This means that you do not interact with the instructor in real time. You upload a piece of writing for which you are seeking feedback. The writing instructor logs into WCONLINE during the writing appointment time, reads your draft. and provides you with feedback that you can access once the appointment time has concluded.
Cancelling an Appointment
You can cancel an appointment up to two hours before the appointment time. Doing so, will open the time slot for other students.
- Navigate to the relevant schedule in WCONLINE, click on the appointment you want to cancel. The Appointment Details screen appears.
- Click Cancel Appointment. You will receive a notification to your University of Toronto email address confirming that the appointment has been cancelled.
Changing your Profile and Communication Settings
- At the top of the WCONLINE page, click your Name. A menu appears.
- Choose Profile & Communication Options.
- In the Communication and System Preferences section, make adjustments to your email settings.
- To opt into text messaging notifications for appointments, enter your number in the Mobile Number field. Choose your Mobile Carrier from that menu.